
Large images are one of the easiest ways to slow down a website. A beautiful hero photo, product gallery, blog banner, or portfolio image can look great, but if the file is too large, visitors may wait longer than they should. Image optimization is the process of making images lighter, better sized, and easier for browsers to load while keeping them visually sharp.
The good news: you do not need a complex design app to optimize images for the web. A simple workflow of resizing, compressing, converting formats, and removing unnecessary metadata is enough for most everyday website images.
NanoImage is built for this kind of quick workflow. You can use free browser-based image tools to compress, resize, convert, and clean up images without creating an account.
What does image optimization mean?
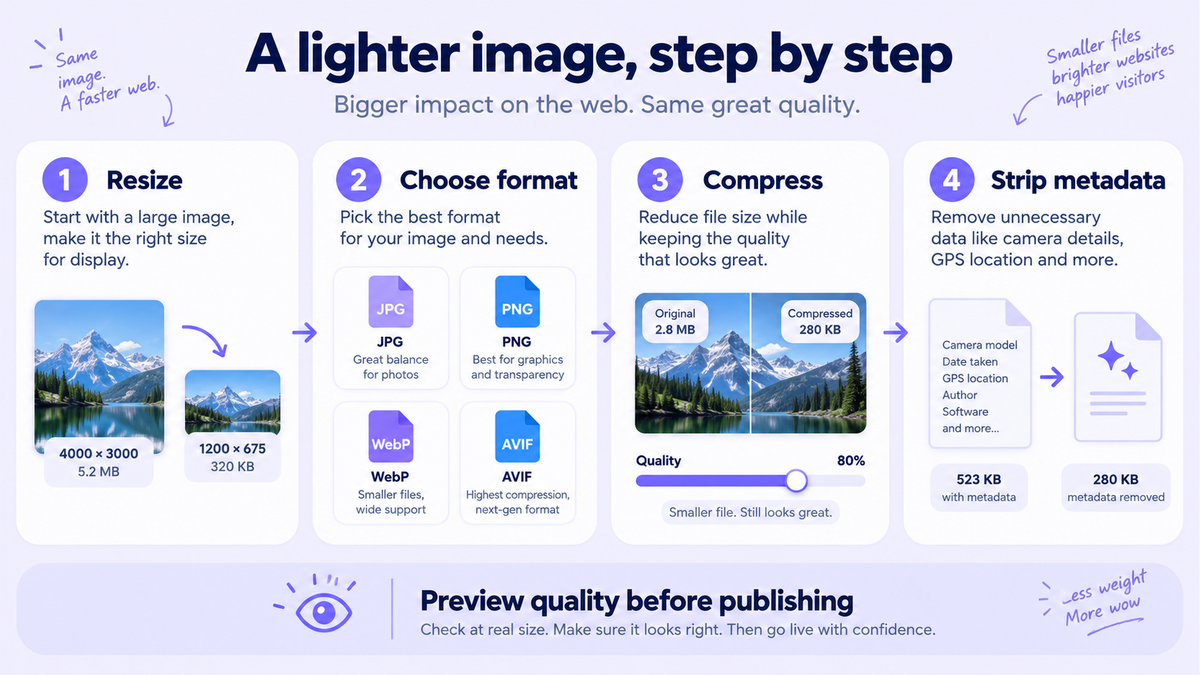
Image optimization means preparing an image so it loads quickly and still looks good in its intended context. That usually includes four decisions:
Dimensions — How wide and tall should the image be?
File size — How many KB or MB should the image use?
Format — Should it be JPG, PNG, WebP, AVIF, or another format?
Metadata — Does the file include unnecessary camera or location data?
A common mistake is uploading a huge image directly from a camera or phone. For example, a 4000 px wide photo may be unnecessary for a blog card that displays at 800 px wide. Resizing before upload can reduce the file size dramatically before compression even starts.
Step 1: Resize images to the size you actually need
Before compressing an image, check where it will appear on your website. A full-width hero image needs more pixels than a thumbnail. A product detail image needs more detail than a small icon. A blog image usually does not need to be the full resolution from your phone.
As a practical starting point:
Blog content images often work well around 1200 px wide.
Product thumbnails can often be much smaller.
Social sharing previews usually need consistent dimensions.
Full-screen banners may need larger exports, but still rarely need the original camera size.
Use NanoImage's Resize Image tool when your original image is larger than the display area. This keeps the image visually appropriate while avoiding wasted pixels.
Step 2: Compress the image file
After resizing, compress the image. Compression reduces file size by simplifying how the image data is stored. For photos, lossy compression is often acceptable because it removes detail that most people will not notice. For graphics, screenshots, icons, and transparent images, you may want more careful settings.
Use NanoImage's Compress Image tool to reduce file size quickly. If you are optimizing a full folder of images, use Batch Compress so you do not have to process every file manually.
Good compression should not make the image look broken. The goal is not the smallest possible file at any cost. The goal is the smallest file that still looks good in its real placement on the page.
Step 3: Choose the right image format
Different image formats are designed for different jobs.
JPG is widely supported and usually works well for photos. It does not support transparency, but it is a dependable option for many website images.
PNG is useful for transparency, screenshots, logos, and graphics with sharp edges. PNG can be larger than JPG for photos.
WebP often provides strong compression for web use and supports transparency. It is a good default choice for many modern websites.
AVIF can produce very small files with good quality, but support and workflow needs should be considered depending on your audience and stack.
If you want smaller website images, consider converting JPG or PNG images to WebP. NanoImage's Convert to WebP tool is a useful step after resizing and before final upload.
Step 4: Remove unnecessary metadata
Images can include hidden metadata such as camera model, lens settings, timestamps, and sometimes location information. This information is not usually needed for website display. Removing metadata can slightly reduce file size and may improve privacy when sharing images publicly.
Use NanoImage's Remove EXIF tool before publishing sensitive or personal photos. This is especially useful for author headshots, location photos, community images, and user-submitted content.
A simple image optimization workflow
Here is a fast process you can reuse:
Start with the original image. Keep a backup if the image is important.
Resize it to the actual display size you need.
Convert it to the best format for your use case, such as WebP for many web images.
Compress it until the file is lightweight but still clean.
Remove metadata if privacy matters.
Upload and test the image on desktop and mobile.
This workflow is simple enough for bloggers, marketers, designers, ecommerce teams, and developers who need clean assets without opening heavy software.
Common mistakes to avoid
Uploading original camera files
Phone and camera images are often much larger than needed. Resize first.
Compressing before resizing
Compression helps, but resizing oversized images usually makes the biggest difference.
Using PNG for every image
PNG is great for transparency and sharp graphics, but it is not always the best choice for photos.
Ignoring mobile display
Many users visit websites on mobile devices. Test whether your images look sharp and load quickly on small screens.
Keeping metadata by default
If the image is public, ask whether the hidden metadata is useful. If not, remove it.
When should you use each NanoImage tool?
Use Resize Image when the image dimensions are too large.
Use Compress Image when the file size is too heavy.
Use Batch Compress when you have many images.
Use Convert to WebP when you want a modern web-friendly format.
Use Remove EXIF when privacy matters.
For the full set, visit Optimize Images.
FAQ
What is the best image size for a website?
There is no single best size. The best size depends on where the image appears. A blog hero, product thumbnail, and full-screen banner all need different dimensions. Resize images to match the display area rather than uploading the original file.
Should I use JPG or WebP for website images?
JPG is reliable and widely used for photos. WebP is often a good choice for modern websites because it can provide strong compression and good visual quality. Test the result and choose the format that works best for your site.
Does compression reduce image quality?
Compression can reduce quality if pushed too far. The best approach is to find a balance: a smaller file that still looks sharp in the actual page layout.
Can I optimize images without uploading them to a server?
Yes. NanoImage tools are designed to run in your browser, so common image tasks can be completed locally without account setup.
Final takeaway
Image optimization is not one single action. It is a short workflow: resize, compress, convert, and clean up metadata. Once you build this into your publishing process, your images become easier to manage and faster to load.
Start with the full Optimize Images tool collection, or go directly to Compress Image, Resize Image, and Convert to WebP.