
Images are not always the right size for where you want to use them.
A photo from your phone may be too large for a website. A product image may need a specific width. A profile picture may need to be square. A document upload form may reject images that are too big.
That is where image resizing helps.
In this guide, we’ll explain how to resize images properly, how to avoid blurry results, and what size settings work best for websites, social media, email, and documents.
What does resizing an image mean?
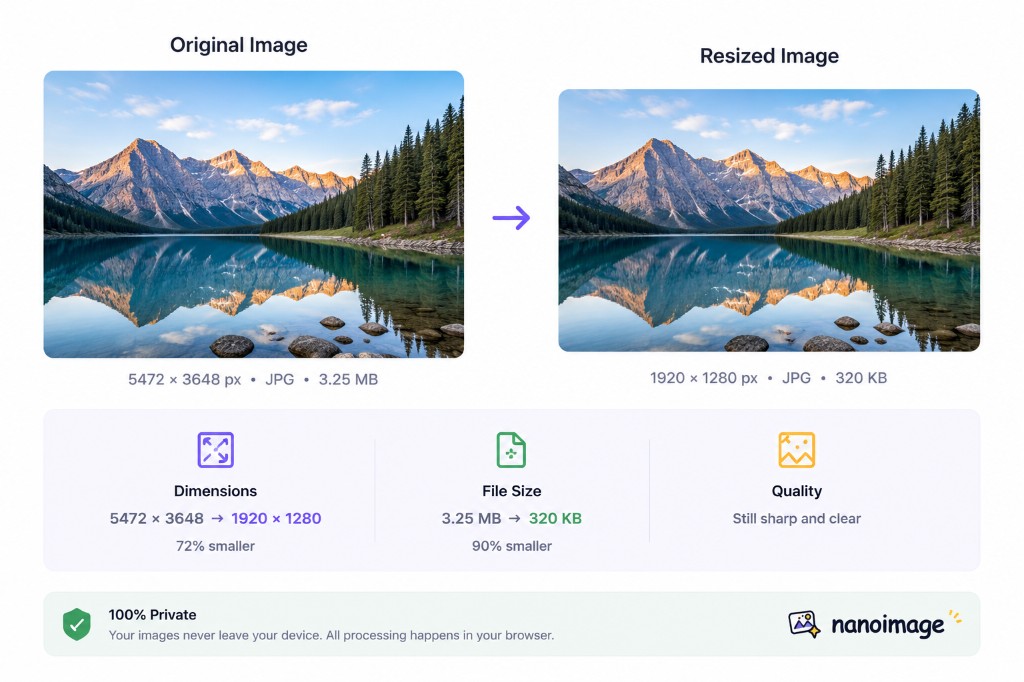
Resizing an image means changing its width and height.
For example, you might resize an image from 4000 × 3000 px to 1200 × 900 px.
The image keeps the same visual content, but it uses fewer pixels. This usually makes the file smaller and easier to upload, share, and display.
You can also make an image larger, but enlarging an image does not magically add real detail. If an image is too small, increasing its size too much may make it look soft or blurry.
Why resize images?
Resizing images is useful for many everyday tasks.
Faster websites
Large images slow down pages. If your website only displays an image at 1200px wide, uploading a 5000px-wide image is usually unnecessary.
Resizing images before uploading can improve loading speed and user experience.
Better social media posts
Social platforms often recommend specific image sizes or aspect ratios. Resizing helps your image fit correctly without awkward cropping.
Easier email sharing
Large images can make email attachments heavy. Resizing photos before sending them can reduce file size and make delivery easier.
Cleaner documents and PDFs
Oversized images can make Word documents, presentations, and PDFs unnecessarily large. Resizing helps keep files manageable.
Fewer upload errors
Many forms and websites have file size or dimension limits. Resizing helps your image meet those requirements.
Resize vs crop: what is the difference?
Resizing and cropping are different.
Resize
Resize changes the image dimensions while keeping the full image content.
Example: 4000 × 3000 px → 1200 × 900 px.
Nothing is removed. The whole image becomes smaller or larger.
Crop
Crop removes part of the image.
Example: 4000 × 3000 px → 1080 × 1080 px square crop.
Part of the image is cut away to fit a specific shape or composition.
Use Resize Image when the image content is already correct but the dimensions are wrong.
Use Crop Image when you need to remove unwanted areas or change the composition.
Pixels, percentage, and aspect ratio
Before resizing an image, it helps to understand three basic ideas.
Pixels
Pixels are the tiny dots that make up an image. Image size is usually shown as width × height in pixels.
Example: 1920 × 1080 px.
This means the image is 1920 pixels wide and 1080 pixels tall.
Percentage
You can also resize by percentage.
For example, 50% means the new width and height will be half of the original size.
If your image is 4000 × 3000 px, resizing to 50% gives you 2000 × 1500 px.
Aspect ratio
Aspect ratio is the relationship between width and height.
Common aspect ratios include:
1:1 square
4:3 classic photo
16:9 widescreen
9:16 vertical video or story
4:5 social post
When resizing, you usually want to keep the original aspect ratio so the image does not look stretched.
Always keep aspect ratio when possible
One of the most common resizing mistakes is stretching an image.
For example, if you resize a 4000 × 3000 image to 1200 × 1200 without cropping, the image may look squeezed or distorted.
To avoid this, turn on Keep aspect ratio. This automatically adjusts one dimension when you change the other.
For example, if your original image is 4000 × 3000 and you change the width to 1200, the height becomes 900 automatically.
Best image sizes for common uses
There is no single perfect image size, but these recommendations work well for most everyday situations.
Website hero images
Recommended: 1600–2400 px wide.
Use larger sizes for full-width banners, but avoid uploading huge 5000px images unless truly needed.
Blog images
Recommended: 1200 px wide.
This is usually enough for article images and keeps file size reasonable.
Product images
Recommended: 1500–2000 px wide.
This gives enough detail for zoom or product galleries without making the file too heavy.
Email images
Recommended: 800–1200 px wide.
Email clients do not need extremely large images.
Profile pictures
Recommended: 400 × 400 px or 800 × 800 px.
Use a square crop first if needed, then resize.
Social media posts
Common sizes:
1080 × 1080 px for square posts
1080 × 1350 px for portrait posts
1080 × 1920 px for stories or vertical images
1200 × 630 px for link previews
Always check the latest size requirements for the platform you are posting to.
Should you resize before or after compression?
Usually, resize first and compress after.
A good workflow is:
Resize the image to the dimensions you actually need.
Compress the resized image to reduce file size.
Preview the result before downloading.
Why resize first?
Because compression works better when the image is already the correct size. If you compress a huge image and then resize it later, you may lose quality twice.
Can you enlarge an image without losing quality?
You can enlarge an image, but there are limits.
If you make a small image slightly larger, the result may still look fine. But if you enlarge it too much, it may become blurry or pixelated.
For example, 800 × 600 px → 1200 × 900 px may be acceptable.
But 800 × 600 px → 4000 × 3000 px will usually not look sharp unless you use advanced AI upscaling.
For NanoImage, basic resizing and upscaling are designed for simple browser-based tasks, not AI super-resolution.
Best practices for resizing images
1. Start from the original image
If possible, resize from the original file instead of a previously compressed or resized copy.
This helps preserve quality.
2. Do not resize repeatedly
Every time you resize and re-export an image, quality may change. Try to resize once from the best available source.
3. Keep aspect ratio on
This prevents stretching and distortion.
4. Resize to the display size you need
If your website displays an image at 1200px wide, resize it close to that width.
5. Use the right output format
Use JPG for photos.
Use PNG for transparency or sharp graphics.
Use WebP for smaller web-ready images.
6. Preview before downloading
Check important details such as text, faces, product edges, and logos.
Common resizing mistakes
Stretching the image
This happens when width and height are changed independently without keeping aspect ratio.
Making images too small
If you resize too aggressively, the image may look blurry on high-resolution screens.
Uploading oversized images to websites
This slows down your website and wastes bandwidth.
Enlarging low-resolution images too much
Basic resizing cannot recover missing detail.
Choosing the wrong format
A resized PNG photo may still be much larger than a JPG or WebP version.
How to resize images with NanoImage
NanoImage makes resizing simple.
Open the Resize Image tool.
Upload or drag and drop your image.
Choose to resize by pixels or percentage.
Enter a new width or height.
Keep aspect ratio turned on if you want to avoid distortion.
Choose an output format: PNG, JPG, or WebP.
Preview the result.
Download your resized image.
NanoImage is designed for everyday image tasks, so you can resize images quickly without installing software or creating an account.
Do resized images stay private?
NanoImage is built around browser-based image tools whenever possible.
For core tools like resizing, your image can be processed locally in your browser. That means your file does not need to be intentionally uploaded to our servers.
This makes NanoImage useful for resizing personal photos, screenshots, documents, and web images while keeping the process simple and private.
Resize and compress for the best result
If your goal is to reduce file size, resizing and compression work best together.
Example workflow:
Resize a 4000px-wide image to 1200px wide.
Convert it to WebP or JPG.
Compress it with a balanced quality setting.
This can reduce file size dramatically while keeping the image visually clear.
Final thoughts
Resizing images is one of the simplest ways to make files easier to upload, share, and use online.
The key is to resize with purpose:
Choose the dimensions you actually need.
Keep aspect ratio on.
Avoid enlarging too much.
Pick the right output format.
Compress after resizing when file size matters.
With NanoImage, you can resize images in seconds, directly in your browser, with no signup required.
Try it now
Use NanoImage to resize your images online for free.
Resize Image: /resize-image
Compress Image: /compress-image
Convert to WebP: /convert-to-webp